Resources
Story Brief Basics: What to Look For and How to Respond
By Stephanie Walden November 9th, 2023I recently received an email from a potential new client that gave me pause: “We’re looking for an article about home mortgages for millennials. We’re open to suggestions on formatting. What’s your rate?”
After seven years of freelancing, I’ve learned the hard way that an assignment that comes in the form of a three-sentence email is often a wolf in sheep’s clothing. A simple primer on home loans sounds easy enough. But this vague direction leaves a lot of open questions: How many words is the client expecting? Are source interviews required? Does the client want specific products mentioned? Without these details outlined from the get-go, the potential for endless rounds of revisions skyrockets.
That said, there’s such a thing as too much detail in a project brief. I don’t need to know a brand’s entire origin story to write a 500-word article. Really, I’m looking for a Goldilocks situation—a length and level of depth that’s juuuust right.
As a writer, knowing what to look (and ask!) for at the start of a project can keep you from getting burned later on. Here’s a quick primer on story brief basics you should know as a contributor on Contently.
Story brief basics with Contently
As a platform that pairs top-tier brands with skilled freelance creatives, Contently eliminates a lot of ambiguity by design. Often, by the time a story is ready to go to a writer, the assigning editor will have already hammered out the basics—angle, word count, and tone of voice, for instance. In other words, those half-baked, three-sentence-style “briefs” are pretty rare.
As soon as you hit “accept” on a story assigned to you in Contently, you’ll get access to the brief. It will likely look something like this:
Contently’s story briefs have a few different functions. First and foremost, they provide a blueprint for the project’s direction, including the length and key points to hit. Briefs are also where you’ll find any relevant background links, sourcing material, and assets you may need. Finally, briefs serve as an informal contract, ensuring all parties know exactly what’s expected in terms of deliverables, details, and deadlines.
Anatomy of a successful story brief
Here’s a breakdown of the sections to scrutinize before you begin working on a project.
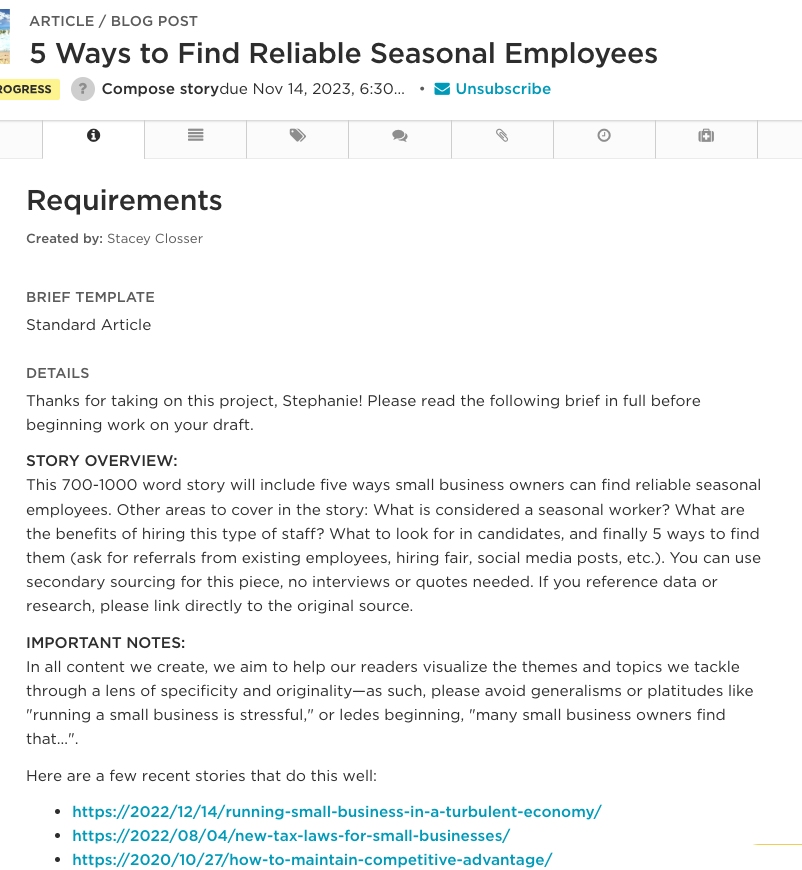
Requirements
This is where you’ll find clearly outlined expectations for the project. Each ME treats this section a little differently, so you’ll probably notice some variation from client to client.
Some MEs break up the assignment details into sections or bullets, while others may write out instructions in a more thorough, paragraph-style format. When I create brief templates as an ME, I usually include the following:
- A project overview, which outlines the assignment in two or three paragraphs. This includes information like which client products to highlight, if interviews are necessary, CTAs to include, etc. I might also include a subsection of key questions this article should answer.
- Important notes, where I highlight things like where the piece will be published, how the client plans to use it, and any key performance indicators (KPIs) or actions the client hopes a reader will take.
- Background material, where I add links to content, which the writer can reference for tone, style, or context.
- A list of dos and don’ts bullet points recapping some of the client’s most pressing compliance concerns or stylistic preferences.
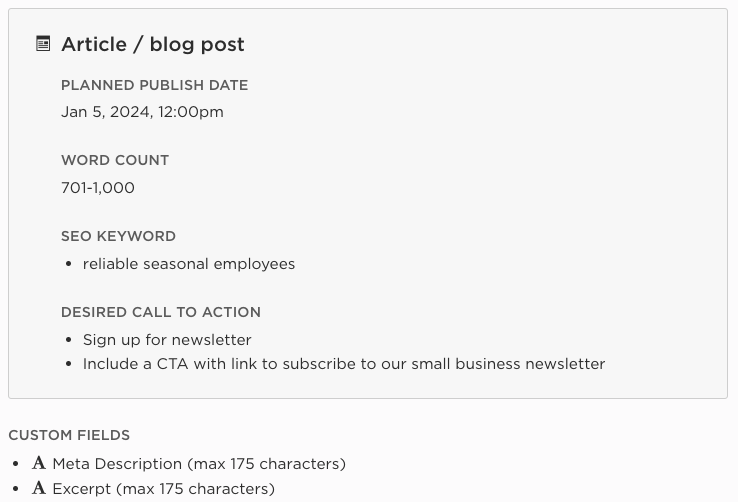
Project format and logistics
Underneath the “requirements” text, you’ll find a gray box with some quick-hitter details including:
- The project format (e.g., article, infographic, video, etc.)
- The project’s planned publish date (this is not the deadline; you can find that in the “workflow” tab—the button with three vertical lines on the righthand sidebar)
- An approximate word-count range
- SEO keyword
Additional materials
Directly below the project logistics box, you’ll find “additional materials.” If the assignment involves any external documents, PDFs, slide decks, style guides, or other reference material, this is where you’ll find it. Simply click the links to download or view the assets. Occasionally, editors may also use the “assets” tab—the button with the paperclip icon—on the righthand sidebar—to upload documents or images. Be sure to check both sections if you’re hunting for something like a style guide.
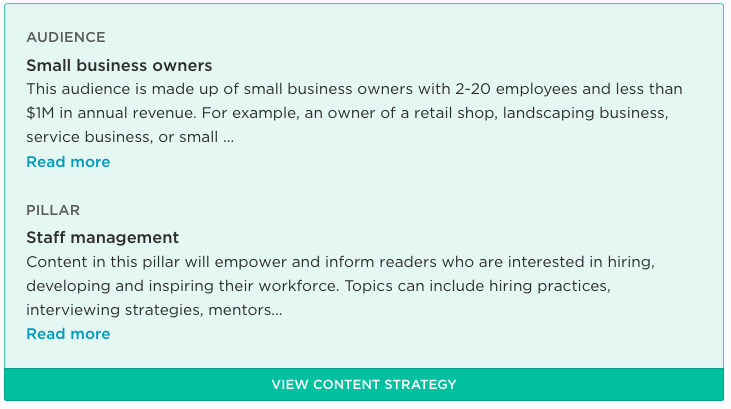
Audience and pillar
At the very bottom of the brief, you’ll find the target audience—the cohort you’re trying to reach or talk to—as well as the “pillar,” which is the strategic bucket that this project falls under. Hit the “read more” links to find full descriptions of these items.
You can also view the client’s overarching content strategy by clicking the button at the bottom of this box. It’s a good idea to take a peek at this, particularly if it’s your first time working with the client. Reading through their strategy can give you a sense of how this particular project fits into larger marketing goals or initiatives.
How to read and follow story briefs
Sometimes—particularly when a project is a rush job—editors may not have a chance to drill down into all of these details before they send a brief your way. In these cases, it’s important to ask for clarifications on any gray areas before you begin work.
Below is a step-by-step guide on how to read briefs analytically, as well as a few important questions to ask.
1) “Accept” the story and read through the brief as soon as it’s assigned—even if it’s not due for days or weeks. This way, you know you have everything you need to avoid a last-minute scramble on deadline day.
2) Ask yourself the following questions:
- Is the assignment, including the specific deliverable(s) expected of me, clear?
- Do I know what style guide to follow? (Or, for a design project, “Do I have the client’s visual guidelines/font files, etc.?”)
- Do I know why the client is creating this and how it fits into their larger goals?
- Has the client provided any URLs, product specs, or CTAs for me to note?
- Are there any SEO keywords included in this project?
- Do I have access to all the sources or reference material provided by the client—including permissions for things like Google Docs, slide decks, or paywalled sites?
3) Ask your ME for clarification about anything that’s unclear or missing from the checklist above.
4) Cross-reference the brief while writing to stay on track. Personally, I like to copy the brief into the text editor and delete relevant sections as I address them. This way, I know I’m hitting all the core components.
5) Read through the brief one final time before hitting “submit” on your project. Being thorough at this stage will help cut down on revisions.
With a “just right” brief in hand, you’ll be in a better place to craft stories that meet client expectations and avoid revision purgatory. Putting in a little upfront time to hit that sweet spot is often well worth the effort.
Now that you have the story brief basics down, subscribe to The Freelancer to stay up to date on freelance writing, networking, and business tips.
Image by Nuthawut Somsuk